Sunday, December 21, 2008

Snowy Christmas~


Wow, we are just absolutely in awe about the snow we are getting in our area lately! It has been snowing basically all week and we LOVE it! I would have liked to go visit the finger lakes region of New York during Christmas time because I fell in love with it while we were there on vacation and I wanted to see it when it was full of snow, but now it is in our own front yard and we are just having so much fun. We took Oliver, my yorkie out in it today for a while and he had a great time and I laughed watching him move his little body through all of that snow. I have been in the craft room most of the day and have pretty much all of my Christmas projects done! I am so excited to be done and have several days until the big day! I have enjoyed making so many different things, but haven't posted much of them since I plan on giving them away for Christmas and want them to be a surprise!!... so here is a couple more of those favorite little pouches I love to make. I gave these away at my office Christmas lunch last week and had them at their place settings when they arrived at the restaurant. We had a great time.. I love getting together with them for the holidays! I hope you can see the little miniature trifle dish in the pic that I put several peppermint sticks in and then added some rub-ons and paper and ribbon and then wrapped it all up. I am getting excited about the new catalog coming soon! Get ready... I sure am. Well, if I don't get a chance to post again before Christmas, I hope you all have a wonderful holiday with your families and take good care.. Merry Christmas to you!

Sunday, November 23, 2008

A Monogrammed Thanksgiving~


Good Evening! I would like to apologize for not posting in a while.. I seem to be going through these little cycles lately but not because I am not keeping busy in the craft room, that's for sure! I have been making lots of special little gifts for my friend at work. She wanted something to have for her family on Thanksgiving and I love, love, love these super easy to make treat holders. I thought it would be nice to personalize them by adding the monogram to the fronts. I saw the little feathers with the gold beads and leaves and thought they would be perfect to stuff inside with the candy and they reminded me of a turkey, so why not.. I used the SU! Autumn Vine DP paper. I have used this paper so much this fall. I love the colors and the patterns. You can find this in the holiday mini... speaking of, if you haven't ordered from that catalog yet, you must take a look. I love it.. the snowflakes are just fantastic. You can attach them to gifts, cards, tags, and I thought they would be perfect on the front of these treat holders for Christmas and tuck a gift card inside, what do you think?? I will post one for a sample for you when I get my Christmas paper in this week. Well, I hope you enjoy the week and we are looking so forward to Thanksgiving. I smell stuffing.. sniff, sniff, sniff! hee hee.. Have a great night and a terrific holiday with your family. I'll be back around soon!

Another View~


Here is just a couple of them a little bit closer.. these don't stand up very well, so they are a bit harder to get a good pic! Have a great night!

Monday, October 20, 2008

I'm Back... In Time for Halloween!!

~Well, hellooooo everyone! I am finally back in the blogging world girls! Yippee.. Where have I been lately??? Just super busy with the house, work, summer, and now fall, but I haven't stopped my stamping addiction.. Heck, no! I have been doing that as well. In fact, I really was excited to post tonight since I have some new pics to share with you! I have to say, besides Christmas, Halloween is my most favorite holiday. I love the season all together really. I just love the fall colors, the leaves, the pumpkins (the pumpkin pie, yummm-o!) and a great reason to have a themed workshop. I had a halloween workshop with some of my favorite women in the world, and some new ones that joined us too that I just was so excited to have join us! I took some pics of the projects before I packed them up and of the workshop. Unfortunately, my camera did not take many good ones, they were very blurry, maybe I didn't need the flash, so they came out really weird, but here are a couple of the ones that looked okay. It was a great time, my boss Pat (the only guy there) came and stayed the whole time creating with us and sharing time with his wife.. (sweet huh!) Thank you to everyone that attended! I had so much fun with everyone. I am so glad to get back to my blog. I missed this ya know! I have more pics I will post soon of a workshop I did a couple of weeks ago.. Be back soon with those.. have a great evening.

Close Up of Pillow Box Treats

Here might be a better picture of the pillow box treats made with the Big Shot pillow box die.

Workshop Treats

~I made a bunch of these little pillow boxes with my Big Shot and the Ghostly Greetings DP to give as a little gift at my workshop. These were so easy to make. They go together so easily and are so dang cute! If you need more information on these or the Big Shot, please let me know! Enjoy~

Party Girls~

~Here they are... hard at work on their projects. It is so fun hanging out with them all!

Tuesday, August 12, 2008

New Catty's are Here~

Hi there... If you haven't heard already they are here and super fabuous! Ya know, I just can't get enough of this new catalog.. I hope you have a copy of your own because you will love it too. I have looked at it from front to back probably twenty times since the weekend and making out my growing wish list. I did put in an order yesterday and cannot wait until it all arrives. I have been super busy working on house stuff, so not a lot of card making lately, but the new sets are definitely getting me truly inspired to get busy! I love all the new additions, the new in-colors and the ribbons to match are so cute! I also ordered a Big Shot so I can start making some samples to share with you. If you are interested in ordering one for yourself, you only have to wait a bit longer, Sept. 2nd to order.. yippee. It's not too late to get a catalog, so let me know if you would like one! I posted the new dormant list of stamps that are still available until January 18th, but just not in the current catalog. Please click on the right under Dormant List to view the list and you have plenty of time if you are interested in ordering any of them. I also posted the new Never Before Seen new stamp sets that SU! is offering for 15% off through September 30th. Okay, lot of info I know.. Well, have a great evening.. I'll be back with some samples soon. See ya later!

Monday, August 4, 2008

SU! Excitement~

Hello!! I am so excited about all of the newest Stampin' Up! news.. Let's see first of all I just put a link on the right to view the new catalog sampler that runs from August through January.. Take a look, cute, cute, cute! You can also begin ordering out of the new Fall/Winter main catalog on August 11th and as soon as I get them in my hot little hands, I will get them to all of you that have preordered one. I have seen many glimpses from the new catalog and there is so many neat things.. The hodgepodge hardware will now be available in both silver and vanilla, there are new punches, new ribbon, new In Colors, new designer paper, and of course new stamp sets. You will be happy to see that many of the things in the recent minis have made it into the catalog as well.. Yippee!! I wanted to let you know that I have deleted the accessories list from my blog page just because it took up so much space and you had to weed through it all to get to anything else, so if there is something you still would like to order, please just send me an email and I will try my best to get it ordered for you and I will let you know right away if it is at all still available. The biggest news of all is......... okay, SU! is partnering with Sizzix and will have its own version of the Big Shot, made exclusively for SU! It is just so great.. there are tons of projects you can do with this machine and all of the dies Sizzix offers will of course still work with the SU! Big Shot. Stampin' Up! will have exclusive dies only to SU! and you will have the chance to order the Big Shot as a set with dies and accessories to get you started in early September. I put a link on the right as well so you can take a look and start saving now! hehee.. I definitely think it will be well worth the cost since there will be so many great things you will be able to create with this machine! I think I got most of it out of my system.. my list is growing by the day and I haven't even gotten the new catalog yet.. yikes! I will have a project to post as well this week, it has just been a little crazy lately. Well, looks like it might be in the triple digits here tomorrow so everyone try and stay cool if you can. Enjoy the evening. Be back very soon..

Sunday, July 27, 2008

Little Star~

Happy Sunday! We had a great road trip yesterday.. where did we go, well, where else, Seattle bound of course! hahaha, I know, we really need to branch out huh! So, Cabela's and Impress were the places of choice and I picked up some neat things.. I am trying not to buy much with the anticipation of the new SU! catalog coming out so soon, but I couldn't help myself. Actually, this was more of a paper punch quest. They have a wall full of any shape and size you need, so of course they had what I was in search of and my mom went with me and sat in a comfy chair and watched me walk back and forth through the store about a dozen times just in case I missed something.! :-) What a great mom to be that patient with her lunatic daughter! Anyway, on to the card... This baby card is for a soon to be mommy at work.. She is about to burst! No clue if it is a girl or boy yet, so we'll just wait and see....
I found this paper at Impress a couple of weekends ago and was waiting to put it to use. I love the cutouts in the paper so I layered some groovy guava to show through the cutouts.. I love the new flocked brads, they are really cute! I stamped the swirl in chocolate chip, and the little star sentiment in groovy guava. The paper is whisper white, soft sky, old olive, groovy guava, and chocolate chip and finished with some wild wasabi ribbon.
Have a great week.. I sure wish I was going to SU! convention this year with all of those lucky ladies attending next week. I think we might try for next year though, yippee! Be back very soon.

Sunday, July 20, 2008

Anyone for a Popsicle~

Well, I have been seeing these all over the place and thought they were the cutest things.. so I had to sit down and make a few. I didn't have a template so I kind of configured my own, but I think they came out okay.. I love the bright colors.. they just scream summertime! These would be just so cute for a summer birthday invitation I thought, but I just stamped "have a great day," inside the lemon and lime cards and then used my "orange you cute" from my SU!
set for the orange popsicle. The paper is all Bazzill paper and used my new ScorPal for the crease down the center. I stamped the citrus stamp from my SU! Tart and Tangy in coordinating colors to match the paper and some sheer polka dot ribbon around the popsicle stick. I have seen double popsicle sticks too.. I will have to try that next time..

I had a workshop on Saturday and I would love to share a couple of the projects we made. We had a great time. I will post them in the next day or two.. I am anticipating the SU! retired accessories list that I will have a link to on my blog by tomorrow evening. If there is anything you have been looking at that you may have been putting off, please take a look at the list to see if it will still be available in the next catalog. I don't want you to miss out. I hope you have a great week. If you want to be on my preorder list for the new catalog, please email me by July 31st.. Good night!!

Miss Dallas~

Good Evening!! A couple of posts tonight.... yay, I am back again after a very busy couple of weeks. We had our very good friend up to see us from California and we spent as much time with her as we could while she was here and had a great time going to the beach while she was here. We all had a great time and we loved having her come visit! Love you Sharon.. While she was here we were invited to our friends, Dave and Becky's house for a Fourth of July barbecue. They just bought a new house and we were all excited to see it now they are all moved in. It looks great and we had such a great time. While I was there I snapped this picture of their adorable little dog, Dallas. She is a sweetheart and posed quite well I thought... I had to share it with you. On to the next post... stay tuned!


Wednesday, July 2, 2008

Fourth of July Pinwheel~

HI there..... well the 4th is almost here! Can you smell Bar-B-Q! Yummmm, I sure can. We have yet to have a bbq in our own backyard so I can't wait to have a hamburger or hot dog on Friday. Yippee! I kept thinking I would make a bunch of cards for the fourth but since I wasn't quite there as of this week, I decided to at least post what I made tonight. I have had this pinwheel stamp for a while and thought of this one for my patriotic card. I was up at Impress Stamps over the weekend (YES, again!! LOL..) and one of the ladies showed me this quick little pinwheel to mount on top of my stamped image using just a 1" square punch and some scissors. You punch out the square and then cut in at each corner into almost the center on all four sides. Then you fold every other side over and then finish it off with a brad in the center.. really simple. I used a patterned piece of paper with a white backing for the two tone effect when you make the folds. I stamped the fourth of july sentiment and then punched the stars out with my fiscars star hand punch before I mounted it to the same patterned red paper as the pinwheel for the background, added some ribbon and I think that about does it.. this is a very simple looking card, but I think it is cute just the same!

Oh, I also wanted to mention that Stampin' Up! is launching their new Decor Elements line for home decor products. They are just the neatest thing and coordinate perfectly with SU! stamp sets. I added a link on the right of my blog so you can view the brochure and see what you think. I think these will be huge!! Also, I just was able to order some sneak preview stamp sets from the new catalog. I hope to share some samples after I get them. I think you are all going to love, love, love the new In Colors!! I do.

I really hope you have a great Fourth of July and enjoy the fireworks, family and tasty food too. Good Night.

Monday, June 23, 2008

Flower Power~

Hi there... another card to share tonight.. wow, was I in a flower mood this week. I couldn't stop myself. I just love watching them come back year after year bigger and better, well, at least you hope they do.. It is so rewarding to see your work in the dirt pay off! Well, card making is kind of like that too I think. That is why I love these hobbies so much. This card is really simple, just a lot of piecing together. The stamp for the stems is from Impress. I stamped it twice to get the long row across. I used some chipboard flowers, SU! ink in Certainly Celery, SU! soft subtle brads, soft subtles textured paper and 1/4" inch ribbon. The thanks a bunch sentiment is also from Impress Rubber Stamps. Thanks for stopping by.. have a great rest of the night~

Sunday, June 22, 2008

Flower Happy~

Good Evening! We can actually officially say Happy Summer.. we are so happy around here to have some sun, so happy I was in the mood to plant some flowers this weekend so off to the garden center I went. I love bringing them all home and getting them planted. My little yorkie Oliver kept me company out in the yard and I love watching him run around with his hair blowing in the wind.. so cute! After planting today, I grabbed one of my flower stamps to make this card and wanted to use some of my wild saffron paper for the background.. I love this paper because it coordinates so great with the Stampin' Up inks and paper. I started with some bazzill textured chocolate paper, then layered a piece of the wild saffron and tore some coordinating wild saffron for the bottom. I thought this paper matched pretty nicely with my flower stamp. Both of the stamps are from Impress. I inked the background with SU! Blue Bayou. The flower stamp I inked with Really rust, so saffron and wild wasabi. I used the SU! ticket punch and pewter brads, then punched out a piece of wild saffron paper with my index tab punch and used a rub on for the "happy." I added some ribbon and a little piece of chipboard. Well, getting late, off to the sack I go.. Have a great week~

Sunday, June 8, 2008

Monogrammed for Me~

Well, after a busy weekend getting ready for housepainting, (uggh!) I thought it would be fun to relax and have fun in the craft room today. I never realized how much stuff you collect outside until you have to take it all down or get it moved away from the house. We are a good team though and we got it done by early evening, so I pray for very little rain this week... pleeeeez! So, back to my little notebook. I was looking around for a notepad to just jot some ideas down real quick and so I thought I would make a little personalized notebook. I had purchased the notebooks a while ago and stocked up when I saw them! I cut some soft sky Designer Paper to fit and then cut a small strip of the same paper and turned it over for a different design and then layered in on top. I pulled out my monogram kit and stamped my inital and background in black onto whisper white cardstock. I layered that onto a piece of soft sky paper that I punched out with my Marvy scallop punch. I embellished a lot with ribbon, I know, but I love ribbon, so what the heck. I alternated the ribbon at the top on the spirals and then tied some more black and white polka dot ribbon around the top of the notebook. I used a brad from the Hodgepodge Hardware set in the Stampin' Up Occasions mini and added it right above the band at the bottom of the notebook. I also used my sanding block to sand the edges of the paper on the corners and sides. I used some of the same paper to wrap the pen. I used sticky tape to attach the paper. By the way the Occasions mini goes away at the end of this month. I love the Hodgepodge Hardware set. It comes with so many cute brads, ribbon slides and other embellishments. If you haven't seen it, check it out.. I have a link on the side that will bring up the Occasions Mini for you. Okay, well, have a great week.! Wish us luck with the no rain thing this week.. Thank you, thank you.. Nighty night!


Monday, June 2, 2008

My New Little Friend~

Hello and good evening. So, I said I had another one for you tonight so here it is. He is my new little friend, my little owl.. ain't he cute?? I had to get this when I saw it at Impress on Saturday. It is from Savvy Stamps and it comes in a set of 7 stamps complete with the branch, the balloon, the owl and four sentiments to use with the balloon or not. I think SU! is coming out with an owl set in their next catalog, but until then, I will play with this one. I started with SU! soft sky cardstock and used my paper cutter to add the scallop at the bottom and paper pierced above. I then layered a piece of patterned paper by Mind's Eye. I added a smaller piece of chocolate chip, real red, and then whisper white for the main images. I stamped the branch and the owl in chocolate chip, then stamped the owl again on scrap paper then cut him out and added the image to the top of the first one with some dimensionals to give him some "dimension," then stamped the balloon in soft sky, then added the happy birthday to the center. I stamped a few matching flowers for background in soft sky. I added some two way glue to the balloon and added some diamond glitter to the balloon. I punched several little leaves out of some old olive scraps with a mini leaf punch and glued them to the stems of the branch. I added soft sky ribbon to the top and that did it! I love this plump little guy. I think I will be using him a bunch. I can't resist! I hope you have a great rest of the evening. Time to get my Stampin' Up order ready for this week. I love to sit and go through my catalog and make my first wish list, then alter it about a dozen times before I get it just right and ready to send in. I know I am not alone in this right??? LOL! Night night!

Sunday, June 1, 2008

Impress Road Trip Saturday~

Hi there! Hoping you are having a great weekend... We had a great road trip yesterday. Just a quick trip up to the Seattle area for the day. It is fun to do and my husband and I have a great time chatting on the way up and I of course always look forward to my regular visits to Impress! Stampin' Up! is my true favorite, but I really love Impress and all of their great products and the ladies there are all so very nice! So, I had to grab a few of their newest stamps and couldn't wait until today to try them out.. here is one card. I will post the other one tomorrow~ This is kind of a collage of several of their stamps and they all go great together. I love the little bubbles.. I made this one for some friends of ours that just got married and wanted to get this in the mail to them tomorrow to congratulate them! So for the recipe on this; all of the stamps are from Impress. Check out the link on my page if you are interested in any of them! I used all SU! ink, cardstock and embellishments. I started with chocolate chip and then layered really rust, tempting turquoise and whisper white. I rounded the corners on the white cardstock with my corner rounder. I stamped the dotted swirl with chocolate chip and the big flower in really rust. I used tempting turquoise for the bubbles, but I stamped off onto a scrap piece of paper the first time I inked it up, then stamped the bubbles onto the cardstock. I didn't want them to look too bold so they look a little softer with stamping off first. The other smaller flowers are stamped in real rust and apricot appeal. I then stamped best wishes in real rust and then added a large brad to the center of the main flower, then added the chocolate chip twill ribbon from the soon to be expired occasions mini to the top of the card... I will get my other one posted tomorrow for you.. It is really different for me, so I hope you will like it.. I can't believe it is already June! My goodness.. One month closer to the new catalog coming out. I will email everyone about preordering the new catalog and reminding everyone of the last days to order from the spring summer catalog and the occasions mini. I hope everyone has a great night and talk to you tomorrow!

Monday, May 26, 2008

Celebrating Memorial Day Stamping!

Hello.. hoping you are enjoying your extra day to the weekend.. I really am enjoying it and it gives us a bonus day to get some more stamping in.. I sure won't complain! It is rainy here today, so no picnics outside, darn! Well, here is a card I finished just a bit ago. It is a variation to the one I posted a few posts ago but changed up the colors and added a little to the background and used my new scallop punch for the bottom scallop. This is a great punch becuase it punches your scallops and the circle cut outs all in one step, really handy and I like the look of it. I used my good 'ol Baroque Motifs and it is pretty much the same recipe as the other.. I used soft sky, groovy guava and chocolate chip inks and paper and whisper white for the background of the main image. I stamped a thank you at the bottom and then used my ticket punch to punch out the bottom corner of the soft sky cardstock. That does it I think. I hope you have a great rest of the day and hopefully we will see the sun around here soon. Bye for now!

Wednesday, May 21, 2008

Enjoy The Little Things~

Good Evening!! Wow, I wanted to get this posted tonight even if it is a little late in the evening and by the time my mom sees this post it will be her birthday, so my sweet mama, Happy Birthday to you!!!! I love you, love you, love you! You are the best mom any girl can have and I can't wait to spend the day with you today.. a day of pampering, what could be better! So, in honor of that I made this card to give my mom when she comes over for the day. This set is Stampin' Up! Enjoy Every Moment set.. I didn't buy this set right away.. but gosh, now I can't believe I hadn't. I really think it is great. There is lots and lots of versatility with this one, so think about it for your stampin' collection!! Okay, so here is the recipe: I started with Soft Sky In color paper and stamped some little flowers from the set for the background. I used my new Fiscars border punch, threading water to punch along the bottom front of the card. I tucked a little bit of whisper white underneath to highlight the scallops and the circles. I then used my corner rounder on each of the bottom corners. I layered chocolate chip and groovy guava cardstock onto the soft sky then on whisper white stamped "Enjoy" in chocolate chip ink. I used groovy guava, soft sky and chocolate chips for all of the flowers.. I cut out the flowers and used some dimensionals to adhere them to the cardstock and followed up by adding a couple of rhinestones to the middles of the small flowers inside the "o" and the bigger flower.. I used my ticket corner punch to punch all four corners of the white cardstock and then glued on top of the groovy guava. I stamped the little sentiment underneath and added the chocolae chip twill ribbon. I think that about does it! I hope she likes her birthday card! That's all for tonight.. off to wrap mom's presents! Nighty night!!

Wednesday, May 14, 2008

SO..... What do you ya'll think!!!

Good Evening!! Do you notice anything different this time?? I am so excited my new blog banner is unveiled tonight! Michelle at blogstamper.com designed this sweet and fabulous new blog banner for me... You are great Michelle and thank you for your wonderful work. That girl is so talented!!

She also created this little signature line for me at the end of my blog.. so sweet.. can you tell I love cupcakes.. who doesn't? Right?? LOL!~ Well, I am working on a project and hope to post it in a day or so.. I had to share my excitement with you tonight though.. Plus, it is supposed to be 85 degrees here tomorrow.. yippee!

Have a great evening!

Tuesday, May 13, 2008

Mother's Day Gift Tin

Hi there,
I just wanted to post the tin that goes with the notecards and envelopes I made for the moms! I couldn't fit everything into the picture, but wanted to share it too! Stay tuned.... ~Nicole

Mother's Day Monogram Notes ~

Hello and happy night to you! Well, down to the final three on AI, I can't believe it is almost over.... right in time since I think the weather is getting nicer and I would rather be outside gardening than glued to my tv two nights a week! LOL! It has been fun though.. Anyway, back to the goods! hee hee.. I made two of these gift sets for our moms for Mother's Day.. I made them each four notecards and four monogrammed envelopes to match. I recently got my monogram "DIY" stamp sets from Just Rite and I love, love, love them.. I have already ordered more accessories to go with the sets. They are just fabulous! You can create any type of monogram, one letter to three letters.. perfect for invitations and these note cards. I just ordered some numbers so I can do birthday cards for the kids with the number of their birthday right on the front of a card. I think that will be cute! These are my first cards using my new sets.. I hope you like! I started with SU! Whisper White Cardstock and my prints pack from the SU! level one hostess sets.. I ran the whisper white cardstock through my Cuttlebug with the new swiss dots folder and left a bit on the bottom of the card front unembossed. I then used my circle rounder punch and rounded the bottom corners of the cardstock. I then cut a piece of the Pretty in Pink patterned paper and layered it on the cardstock. I added Pretty in Pink ribbon along the seam of the white and pink layered cardstocks. I then stamped my monogram and border onto the white cardstock in basic black ink and then used my nestabilities to cut the circle. I then used my Marvy two inch punch to punch out the scallop. I then layered the two and then used SU! dimensionals to the back and centered it onto the card front.. Oh, and I added a couple of little rhinestones to the bottom corner of the card for just a little extra...... embellishment of course! My favorite thing! Enjoy and have a great rest of the night! ~ Nicole

Sunday, May 11, 2008

Mother's Day to Cherish~

Good Evening and Happy Mother's to every mom out there! I know I just got home from spending the evening having dinner with two of my favorite moms in the world, my mom and my mother-in-law! I dearly love them both so much and we had a great time.. In honor of that, I wanted to post the card that I did in a workshop a little bit ago and was saving it because I was going to give these to my moms, but then decided to make them something else that I will post tomorrow! So here it is.. I had seen this similar card on a blog and absolutely loved it, and I really thought it would be great for mother's day or any day! I used SU! Baroque Motifs set. If you don't have this, please think about ordering it! It really makes it easy to make beautiful cards with. I used groovy guava in color paper, vanilla and chocolate chip paper, all SU! I cut some scallops out of the chocolate chip and layered it under the vanilla. I then stamped the bottom with cherish sentiment. I added some chocolate chip wide ribbon and then added some rhinestones to to some of the flowers. There you have it! It was a very easy card to create and think it would be beautiful in other colors, such as maybe soft sky and chocolate chip or pretty in pink and chocolate chip.. Hmmm.. I smell a gift card set in the works for me! LOL... Anyway, enjoy the rest of the evening and what is left of the weekend, and again Happy Mother's Day mamas!

Sunday, April 20, 2008

Tart and Tangy Apples~

Hello... hope your weekend is going great (what's left of it anyway). My day was fun filled with cleaning out closets, such fun! It does give you this good feeling though when you finish though, so it was worth it. :) I wanted to post another one of my workshop cards. I couldn't resist bringing along my tart and tangy set. I made one similar to this in another post, but I really wanted to use my scallop punch to just add more cuteness! I have bought probably five packs of this paper so far, and just love it. It is the Stampin' Up! Summer Picnic paper found in the Occasions mini and I use it all of the time.. I saw a scrapbook page with it and it was ADORABLE! So here is the recipe: I used real read cardstock and stamped my apple image in versamark and stamped onto the red for a background. I layered the Summer Picnic paper exposing two different sides. On the green half, I stamped "Sweeter than apple pie" using the One Smart Cookie set and then layered the flower side of the paper over the green. I then added the new twill Old Olive ribbon. I stamped my apple stamp again in Real Red onto White Whisper cardstock, then I used my 1 3/8 circle punch to cut out my apple. I then used my 1 1/4 circle punch and punched a circle in Old Olive and then attached both to the red scallop punched with my scallop punch. I added dimensionals to the back to give it that raised look over the ribbon. This is part of a set of cards too that I am going to make using all of the different fruits in the set. They are so cute! They are also in the Occasions mini and they will only be available until May 31st if you are interested in getting a set of your own.. make your week a great one! Well, off to create something.. hmm, don't know what it is yet, but I'll let you know... Nighty Night.. ~Nicole

Saturday, April 19, 2008

Blissful Post It Note Holder

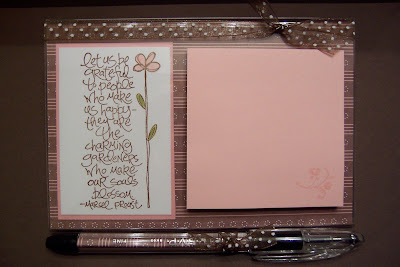
Good Evening! AHHHHH, I feel like everything has calmed down a bit and posting new things has definitely been weighing on my mind so I couldn't wait to get my pictures taken and loaded so I could post something tonight. Yay..! We made these post it holders at a workshop I had last weekend. These are so easy to put together and I enjoy making them. I think these would be perfect for Mom's Day coming up or for a friend or co-worker. I used Stampin' Up! Berry Bliss paper for the background and the pen insert. I liked this paper because it was very easy to find the coordinating pink sticky notes to match. I stamped the image then used blender pens dipped in Stampin' Up Pretty in Pink for the flower and Old Olive for the leaves.. some of the ladies at the workshop colored it in and even used the pink to highlight some of the words. SO creative! Once you have your image colored mount it to a slightly larger piece of Pretty in Pink paper and then slide the paper inside a clear acrylic frame. Use some of the same paper cut to fit the size of the pen barrell you use. Just roll the paper small enough to insert into the barrell and they tied some ribbon around the cap and then use the same ribbon to tie around the top of the frame. So fun! I have a couple of more projects to post this weekend so stay tuned for more. We had a great day today, snow free! They keep saying it is going to snow here, but nothing yet...... we shall see. Have a nice night... ~Nicole

Tuesday, April 1, 2008

Sweet Scents~

Helloooo, I am back at it! Yay!... I apologize for not posting anything in a little over a week. I can't believe it, I was on such a roll, huh! hee hee.. I was not being lazy, believe me.. it was family stuff and it had me away from home for several evenings and my mind was not really into making crafts or cards. My mom was in the hospital and I was with her all last week and taking care of her house too. It was very scary, but she is home and feeling really good. She is the best mom a daughter can ever have and love her to pieces, so I was a little beside myself last week to say the least. But, I am very happy to report, all is great now and I am back in the mood to be creative and share another little gift I made earlier. I had seen one in a craft magazine about a year or two ago and always liked it and wanted to do one of my own. It was so very simple and fun. I just bought a basic jar candle and removed the label on the front. I really liked this one, because of the nice round top but any jar candle will do. I used some textured cardstock and instead of stamping the sentiment I actually printed the words out on my computer in brown ink. I then cut to a square and used my paper tool to rough up the edges and sides for a little worn look. I then took some brown craft paint and dry brushed a bit around the edges. I added the flowers and the rhinestone brad, then added some coordinating ribbon and a pewter charm to finish it off! I thought this would be nice for Mother's Day or any kind of friend gift. I also made one with a pink candle with the same type of look (but gave that away already!) I am so glad to be back at it. I hope you have a great week. It is supposed to be sunny and bright in our area for the week.. yippee! Have a relaxing evening.

Sunday, March 23, 2008

A Little Easter Gratitude~

Good Evening and Happy Easter... I hope you had a great day too. We had a very nice brunch with some of our family and it was great. The kids were running around in their cute little outfits and we took pictures with the Easter bunny, a pink Easter bunny, my favorite color, so I couldn't resist! It's always nice to be with everyone and catch up. So, I made some little gifts for our moms for Easter and while I was doing that, I thought about the idea for this card. I was thinking of making several of these with different sentiments and colors and using them as a set, but for now this is the only one I have done! I really love SU's Groovy Guava and use it so much for cards and projects. I am constantly ordering supplies in that color. I started first with Wild Wasabi Paper, then layered Chocolate Chip and then Groovy Guava. I used Impress Smooth White cardstock on top and stamped the grass in Wild Wasabi, the flower in Groovy Guava and the gratitude sentiment in Chocolate Chip (all stamps by Impress Rubber Stamps). I then used SU's Ginger Blossom paper and my butterfly punch then glued that down leaving the wings free to give it the 3-D effect. I couldn't find my ticket corner punch, so I just used my scissors to cut a slant to the top two corners of the white cardstock so I could add a couple of pearls to each corner. I finished it off with some chocolate colored polka dot ribbon and there you have it! I will try this with a different color scheme soon and see what you think! I just also want to add that I appreciate so much all of you that have left me comments here. It makes me so happy that you take the time to look and that you enjoy the projects. I hope to just keep them coming! So, I really do thank you.. I hope you have a great rest of the evening and a super week. ~Nicole

Thursday, March 20, 2008

Sweeter than Apple Pie~

Good Evening.. we definitely had our share of Spring showers around here today, it even hailed for a while.. This crazy weather! We are looking at yet another rainy Easter here in the Northwest, I guess we will have a bunch of soggy easter baskets. So since we had such a soggy dreary day, I thought when I got home from work I would go into my stamp room and stamp something that reminds me of summer, so here the results of my summer dreaming.. I told you how excited I was to get my hands on this new Stampin' Up Tart and Tangy set and the first piece of paper I grabbed was the apple paper, so I started with that theme. I started with SU! real red paper, and my summer picnic DP found in the new mini that is out until May, yay! Anyway, I stamped my apple in Versamark then stamped onto my red paper. I added the patterned paper, the new old olive twill ribbon and the new ribbon slide.. so cute! I love those little ribbon slides. They are in the Hodgepodge Hardware set. I stamped the apples on white cardstock then cut them out and used Stampin' Dimensionals to mount them to the card. I then stamped the sweeter than apple pie sentiment on each and on the taller card added a couple of green crystal brads at the bottom and used my scallop scissors to add a little scallop detail to the bottom. Both cards are a bit different with the same basic idea.. Have a great weekend and a really wonderful Easter. ~Nicole

Monday, March 17, 2008

Handsome Nugget Tins~

Happy Monday.. ugh! Okay, so I can't get enough of these little nugget tins. I just think they are so cute and such a nice little gift (and perfect for Easter)! I am on the path to being finished with all of the Easter projects I have been working on. I already made some nugget tins and posted them in an earlier post, but I was asked to make some for some boys for Easter and thought, well, I guess I need to tone down the colors from all of the pinks and yellows so I tried this plaid ribbon in chocolate and blues. I changed my nugget stamp to something a little less "girly" and didn't tie the ribbon in a bow, just a nice knot! I hope the boys like them. After all, it is still chocolate underneath all the stuff, right! hee hee. I am looking so forward to Easter. We go to brunch with some of our family and it is always so nice and so tasty too! Have a great rest of the week... ~Nicole

Sunday, March 16, 2008

Embrace Life Post-It Holder

Good Evening, late evening that is! Gosh, it has been several days since I posted something, I guess I have been busy busy! I really have been busy, getting ready for Easter like everyone is and also making some things a friend asked me to put together for her for Easter, so since I am almost done, I thought I would post this tonight! I really love the colors of this. I haven't made any in a while, so I made several of them tonight! I love having these ready to go for a gift, and I was also thinking of making them at a workshop soon. I used the SU Bali Breeze paper and the flower and sentiment stamps from SU's Embrace Life set.. love, love, love that stamp set. If you don't have it, you should!! :) I stamped the flower with Old Olive ink, then used my blender pen to color in the flowers with Pumpkin Pie ink, then stamped the sentiment in Cool Carribean ink and used my word window punch to cut it out. I used some American Crafts orange/polka dot ribbon for the bow at the top. For the pen, I just cut out a small scrap piece of the same paper as the post it holder and rolled it up and placed it inside of the barrel of the pen then finished it off with another little bow! I hope you have a great week and look forward to the beginning of Spring this week!! Good night.. ~Nicole