Hello and happy night to you! Well, down to the final three on AI, I can't believe it is almost over.... right in time since I think the weather is getting nicer and I would rather be outside gardening than glued to my tv two nights a week! LOL! It has been fun though.. Anyway, back to the goods! hee hee.. I made two of these gift sets for our moms for Mother's Day.. I made them each four notecards and four monogrammed envelopes to match. I recently got my monogram "DIY" stamp sets from Just Rite and I love, love, love them.. I have already ordered more accessories to go with the sets. They are just fabulous! You can create any type of monogram, one letter to three letters.. perfect for invitations and these note cards. I just ordered some numbers so I can do birthday cards for the kids with the number of their birthday right on the front of a card. I think that will be cute! These are my first cards using my new sets.. I hope you like! I started with SU! Whisper White Cardstock and my prints pack from the SU! level one hostess sets.. I ran the whisper white cardstock through my Cuttlebug with the new swiss dots folder and left a bit on the bottom of the card front unembossed. I then used my circle rounder punch and rounded the bottom corners of the cardstock. I then cut a piece of the Pretty in Pink patterned paper and layered it on the cardstock. I added Pretty in Pink ribbon along the seam of the white and pink layered cardstocks. I then stamped my monogram and border onto the white cardstock in basic black ink and then used my nestabilities to cut the circle. I then used my Marvy two inch punch to punch out the scallop. I then layered the two and then used SU! dimensionals to the back and centered it onto the card front.. Oh, and I added a couple of little rhinestones to the bottom corner of the card for just a little extra...... embellishment of course! My favorite thing! Enjoy and have a great rest of the night! ~ Nicole
Tuesday, May 13, 2008
Mother's Day Monogram Notes ~
Hello and happy night to you! Well, down to the final three on AI, I can't believe it is almost over.... right in time since I think the weather is getting nicer and I would rather be outside gardening than glued to my tv two nights a week! LOL! It has been fun though.. Anyway, back to the goods! hee hee.. I made two of these gift sets for our moms for Mother's Day.. I made them each four notecards and four monogrammed envelopes to match. I recently got my monogram "DIY" stamp sets from Just Rite and I love, love, love them.. I have already ordered more accessories to go with the sets. They are just fabulous! You can create any type of monogram, one letter to three letters.. perfect for invitations and these note cards. I just ordered some numbers so I can do birthday cards for the kids with the number of their birthday right on the front of a card. I think that will be cute! These are my first cards using my new sets.. I hope you like! I started with SU! Whisper White Cardstock and my prints pack from the SU! level one hostess sets.. I ran the whisper white cardstock through my Cuttlebug with the new swiss dots folder and left a bit on the bottom of the card front unembossed. I then used my circle rounder punch and rounded the bottom corners of the cardstock. I then cut a piece of the Pretty in Pink patterned paper and layered it on the cardstock. I added Pretty in Pink ribbon along the seam of the white and pink layered cardstocks. I then stamped my monogram and border onto the white cardstock in basic black ink and then used my nestabilities to cut the circle. I then used my Marvy two inch punch to punch out the scallop. I then layered the two and then used SU! dimensionals to the back and centered it onto the card front.. Oh, and I added a couple of little rhinestones to the bottom corner of the card for just a little extra...... embellishment of course! My favorite thing! Enjoy and have a great rest of the night! ~ Nicole

Sunday, May 11, 2008
Mother's Day to Cherish~
 Good Evening and Happy Mother's to every mom out there! I know I just got home from spending the evening having dinner with two of my favorite moms in the world, my mom and my mother-in-law! I dearly love them both so much and we had a great time.. In honor of that, I wanted to post the card that I did in a workshop a little bit ago and was saving it because I was going to give these to my moms, but then decided to make them something else that I will post tomorrow! So here it is.. I had seen this similar card on a blog and absolutely loved it, and I really thought it would be great for mother's day or any day! I used SU! Baroque Motifs set. If you don't have this, please think about ordering it! It really makes it easy to make beautiful cards with. I used groovy guava in color paper, vanilla and chocolate chip paper, all SU! I cut some scallops out of the chocolate chip and layered it under the vanilla. I then stamped the bottom with cherish sentiment. I added some chocolate chip wide ribbon and then added some rhinestones to to some of the flowers. There you have it! It was a very easy card to create and think it would be beautiful in other colors, such as maybe soft sky and chocolate chip or pretty in pink and chocolate chip.. Hmmm.. I smell a gift card set in the works for me! LOL... Anyway, enjoy the rest of the evening and what is left of the weekend, and again Happy Mother's Day mamas!
Sunday, April 20, 2008
Tart and Tangy Apples~
 Hello... hope your weekend is going great (what's left of it anyway). My day was fun filled with cleaning out closets, such fun! It does give you this good feeling though when you finish though, so it was worth it. :) I wanted to post another one of my workshop cards. I couldn't resist bringing along my tart and tangy set. I made one similar to this in another post, but I really wanted to use my scallop punch to just add more cuteness! I have bought probably five packs of this paper so far, and just love it. It is the Stampin' Up! Summer Picnic paper found in the Occasions mini and I use it all of the time.. I saw a scrapbook page with it and it was ADORABLE! So here is the recipe: I used real read cardstock and stamped my apple image in versamark and stamped onto the red for a background. I layered the Summer Picnic paper exposing two different sides. On the green half, I stamped "Sweeter than apple pie" using the One Smart Cookie set and then layered the flower side of the paper over the green. I then added the new twill Old Olive ribbon. I stamped my apple stamp again in Real Red onto White Whisper cardstock, then I used my 1 3/8 circle punch to cut out my apple. I then used my 1 1/4 circle punch and punched a circle in Old Olive and then attached both to the red scallop punched with my scallop punch. I added dimensionals to the back to give it that raised look over the ribbon. This is part of a set of cards too that I am going to make using all of the different fruits in the set. They are so cute! They are also in the Occasions mini and they will only be available until May 31st if you are interested in getting a set of your own.. make your week a great one! Well, off to create something.. hmm, don't know what it is yet, but I'll let you know... Nighty Night.. ~Nicole
Saturday, April 19, 2008
Blissful Post It Note Holder
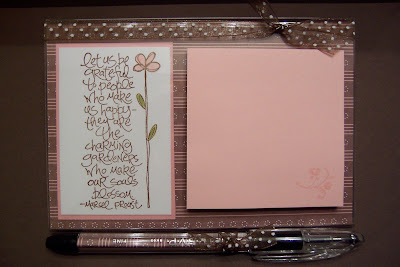 Good Evening! AHHHHH, I feel like everything has calmed down a bit and posting new things has definitely been weighing on my mind so I couldn't wait to get my pictures taken and loaded so I could post something tonight. Yay..! We made these post it holders at a workshop I had last weekend. These are so easy to put together and I enjoy making them. I think these would be perfect for Mom's Day coming up or for a friend or co-worker. I used Stampin' Up! Berry Bliss paper for the background and the pen insert. I liked this paper because it was very easy to find the coordinating pink sticky notes to match. I stamped the image then used blender pens dipped in Stampin' Up Pretty in Pink for the flower and Old Olive for the leaves.. some of the ladies at the workshop colored it in and even used the pink to highlight some of the words. SO creative! Once you have your image colored mount it to a slightly larger piece of Pretty in Pink paper and then slide the paper inside a clear acrylic frame. Use some of the same paper cut to fit the size of the pen barrell you use. Just roll the paper small enough to insert into the barrell and they tied some ribbon around the cap and then use the same ribbon to tie around the top of the frame. So fun! I have a couple of more projects to post this weekend so stay tuned for more. We had a great day today, snow free! They keep saying it is going to snow here, but nothing yet...... we shall see. Have a nice night... ~Nicole
Tuesday, April 1, 2008
Sweet Scents~
 Helloooo, I am back at it! Yay!... I apologize for not posting anything in a little over a week. I can't believe it, I was on such a roll, huh! hee hee.. I was not being lazy, believe me.. it was family stuff and it had me away from home for several evenings and my mind was not really into making crafts or cards. My mom was in the hospital and I was with her all last week and taking care of her house too. It was very scary, but she is home and feeling really good. She is the best mom a daughter can ever have and love her to pieces, so I was a little beside myself last week to say the least. But, I am very happy to report, all is great now and I am back in the mood to be creative and share another little gift I made earlier. I had seen one in a craft magazine about a year or two ago and always liked it and wanted to do one of my own. It was so very simple and fun. I just bought a basic jar candle and removed the label on the front. I really liked this one, because of the nice round top but any jar candle will do. I used some textured cardstock and instead of stamping the sentiment I actually printed the words out on my computer in brown ink. I then cut to a square and used my paper tool to rough up the edges and sides for a little worn look. I then took some brown craft paint and dry brushed a bit around the edges. I added the flowers and the rhinestone brad, then added some coordinating ribbon and a pewter charm to finish it off! I thought this would be nice for Mother's Day or any kind of friend gift. I also made one with a pink candle with the same type of look (but gave that away already!) I am so glad to be back at it. I hope you have a great week. It is supposed to be sunny and bright in our area for the week.. yippee! Have a relaxing evening.
Subscribe to:
Posts (Atom)